I’ve been using Linux for a decade and my desktop environment of choice for the majority of this time was XFCE.
I had tried KDE, Cinnamon and Gnome before but they just didn’t speak to me as I like my DE to be simple (Cinnamon is worth taking a look at, though).
Around 2018, I started using GNU/Linux exclusively and noticed that my setup had been getting more and more minimal until it basically became a tiling window manager but without the tiling functionality.
By that time I had replaced Whisker Menu (the default application launcher) with rofi, removed all buttons from the taskbar, added many keyboard shortcuts so that I wouldn’t have to take my hands off the keyboard to use the mouse, and switched to mainly command-line interface (CLI) apps.
Two months ago, I decided to finally make the switch to a tiling window manager and, having heard many times that it’s one of the most user-friendly ones, my choice fell on AwesomeWM.
Here, I’ll go over the things that I had the most trouble with when switching from a minimal XFCE setup to Awesome. Hopefully, this post will prove useful and save you the time you’d have to spend looking for answers to these common questions separately.
Setting a wallpaper
This is one of the first things that I wanted to do and, while probably not at the top of the priority list, a nice wallpaper makes the rest of the setup a bit more pleasant, so let’s get it out of the way first.
The most common way to do this is using nitrogen. However, I prefer a different method that doesn’t require a separate application for that purpose.
- Open the rc.lua AwesomeWM config file and search for gears.wallpaper.maximized.
- Make sure the line is as follows:
gears.wallpaper.maximized(wallpaper, s, false)
. This’ll make sure that the wallpaper covers the whole screen by zooming in instead of stretching it or putting black bars on the sides. 3. Open theme.lua and search for theme.wallpaper. Then select a wallpaper file, for example ~/wallpaper.jpg. 4. If you use nsxiv as an image viewer, put this piece of code into the key-handler file inside its config folder:
case "$1" in
"b")
	while read file; do
	cp "$file" ~/wallpaper.jpg &&
	notify-send -i "/usr/share/icons/Papirus/64x64/apps/hwinfo.svg" "Wallpaper changed."
	done
		;;
esac
- Choose a wallpaper in nsxiv, press ctrl+x and then b
- Reload Awesome (ctrl+super+r).
You can also extend the key-handler script by making it reload Awesome automatically. The command for that is echo 'awesome.restart()' | awesome-client. If you don’t use nsxiv, you can implement the same logic into, for example, lf file manager.
Autostarting applications
There are at least a few ways of launching applications at system startup with Awesome but most of them don’t prevent the apps from being launched again when the window manager is reloaded. I’ve tried several methods and the one that worked for me involves creating an autorun.sh script and is described in detail here.
Here’s an example of the script:
#!/bin/sh

run() {
  if ! pgrep -f "$1" ;
  then
    "$@"&
  fi
}

run picom
run blueman-applet
run nm-applet
run redshift-gtk
run xfce4-power-manager
By the way, why the hell do so many wiki guides lack examples? Take this line as an example:
list each of your autostart commands, followed by ; inside single quotes, followed by ..
What does that mean?
'app1'; 'app2'; 'app3'; ..?
'app1; app2; app3'; ..
app1';' app2';' app3';' ..
app1 app2 app3';' ..
The last two guesses are ridiculous but it may not be so obvious for someone who hasn’t yet had enough exposure to scripts and other pieces of code. I myself don’t know whether my first or second guess (or something else entirely) is correct. It would’ve been so much easier to just include an example.
Alright, let’s get back on track.
After creating the script, make it executable with the command chmod +x filename. Then, add the following line with the appropriate path to rc.lua:
awful.spawn.with_shell("/path/to/your/autorun.sh")
Below is a non-exhaustive list of necessary and useful utilities and my app recommendations for each.
Apps you should autostart:
- window compositor - picom
- power manager - xfce4-power-manager
- network manager - nm-applet
Things you may want to autostart:
- bluetooth manager - blueman-applet
- color temperature adjustment - redshift-gtk
- keep screen awake - caffeine
- clipboard manager - xfce4-clipman
Application launcher

Rofi is an amazingly versatile tool. I use it for selecting file destinations in nsxiv, confirming deletion, selecting emojis, as a fuzzy finder and more. I highly recommend that you play around with it and see for yourself how much it can do. But let’s get to what I wanted to show you.
To create an application launcher, create a keyboard shortcut with a combination of your choice (for example, I use Super+n) for the following command:
rofi -drun-match-fields name -show drun
Keyboard shortcuts should be inserted into the Key bindings section of the rc.lua file. My shortcut looks like this:
awful.key({ modkey,           }, "n",
    function () awful.spawn("rofi -drun-match-fields name -show drun") end,
    {description = "open rofi menu", group = "launcher"}),
Power-off prompt

For this one, we’ll also use rofi. Create a script:
#!/bin/bash

chosen=$(echo -e "[Cancel]\nShutdown\nLogout\nReboot\nSuspend\nHibernate\nHybrid-sleep\nSuspend-then-hibernate" | rofi -dmenu -i -no-fixed-num-lines -p "What do you want to do?")

if [[ $chosen = "Shutdown" ]]; then
	systemctl poweroff
elif [[ $chosen = "Logout" ]]; then
	jwm -exit
elif [[ $chosen = "Reboot" ]]; then
	systemctl reboot
elif [[ $chosen = "Suspend" ]]; then
	systemctl suspend
elif [[ $chosen = "Hibernate" ]]; then
	systemctl hibernate
elif [[ $chosen = "Hybrid-sleep" ]]; then
	systemctl hibernate
elif [[ $chosen = "Suspend-then-hibernate" ]]; then
	systemctl suspend-then-hibernate
fi
Make it executable with the command chmod +x filename. You may also want to add the directory containing the script (or any other scripts of yours) to PATH - this’ll make it possible to run it like any other command, without having to specify the path to file. Now, all that’s left to do is create a keyboard shortcut for the script - follow the example for the application launcher; my shortcut of choice is Super+Shift+`.
Fixing weird borders around dropdown menus
The issue shown above, a strangely positioned border, usually around dropdown menus, is caused by picom, the window compositor, and can be easily fixed.
Open picom.conf with a text editor, find the shadow-exclude section and add applications which manifest this bug as follows:
  "class_g = 'LibreWolf' && argb",
  "class_g = 'firefox' && argb",
  "class_g = 'org.gnome.Maps' && argb",
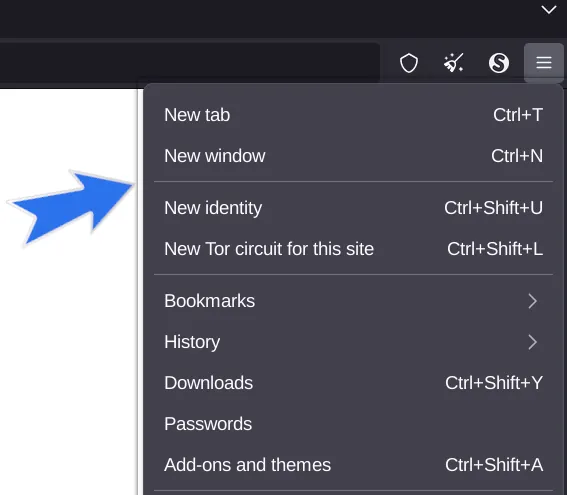
You probably noticed that org.gnome.Maps doesn’t look like an app name. That’s because it isn’t - it’s a window class name.
To find this value, run xprop | grep WM_CLASS in your terminal and click on an open application window. This will return the WM_CLASS string of that app. Also, pay attention to capital letters; Librewolf won’t work but LibreWolf will; you don’t want to know how long it took me to figure this out.
Setting the size of notification icons
By default, if you were to receive a notification with the icon sized, let’s say, 1000x1000, it would take up most of your screen.
To limit the size of notification icons, open rc.lua and change the value of beautiful.notification_icon_size. I’ve set mine to 70 and it looks good.
Battery status, brightness, volume level and other widgets
For these, I use AwesomeWM Widgets. For volume, I recommend the pactl-widget instead of volume-widget, as the latter only supports ALSA. There are many more widgets available there, so help yourself.
Multiple keyboard layouts
If you make use of more than one keyboard layout, create a script with a command like this:
setxkbmap -layout "pl,ua" -option "grp:_shifts_toggle"
and add it to the autorun script we created earlier.
In my case, I can switch between Polish and Ukrainian by pressing both Shift keys at the same time.
If you want to use a different keyboard shortcut, here is a list of possible combinations.
Changing the GTK theme
The easiest way to do this is by using the lxappearance-gtk3 app. It works for GTK2 and GTK3 apps. It also enables you to change the icon and cursor themes. However, it doesn’t work for GTK4 apps. Here’s the Arch Wiki guide on GTK4 theming.
Personally, I use so few GTK4 apps that I just edit their .desktop files. Here’s an example of an Exec line inside the .desktop file for gnome-maps that sets the theme to Adwaita Dark:
Exec=env GTK_THEME=Adwaita:dark gnome-maps %U
Function keys not working
By default, function keys are not defined in Awesome. You have to set them up like any other keyboard shortcuts in rc.lua.
Firstly, you have to find out the keycode of a key combination you want to use, for example Fn+F3 for volume up. To do this, use the command-line tool xev. Run it and press the key combo to get the keycode. In my case, it’s 36 but it probably isn’t the same across all keyboards.
Now, you just have to add your keyboard shortcut to rc.lua in the Key bindings section. Take a look at these examples to get a better idea of what it should look like:
Volume up:
awful.key(
    { }, "#123",
    function () awful.spawn("pamixer -i 5", false) end,
    {description = "increase volume", group = "system"}),
Mute audio (this uses the volume widget):
awful.key(
    { }, "#121",
    function () volume_widget.toggle() end,
    {description = "mute volume", group = "system"}),
Increase screen brightness (this uses the brightness widget):
awful.key({ }, "#233", function () brightness_widget:inc() end,
{description = "increase brightness", group = "custom"}),
Summary
Having read this tutorial, you should now have a simple but functional AwesomeWM setup. Still, there is a myriad of possibilities with this window manager, so it’s likely that you’ll run into something you don’t know how to do. Fortunately, many configuration options can be inferred just from looking at the configuration files, which are very legible, or reading the documentation; the Arch Wiki is also your best friend.
P.S. You might’ve noticed that in this article I’ve italicized application and file names. I think this makes the text easier to read but I’m curious about your opinions so feel free to let me know.